


Have you ever posted a video on Facebook and wanted to tweak it afterward? Learning how to edit video on Facebook shows you what can and can’t be changed after publishing. The rules differ depending on where the video lives. Together with Video Download Free, let’s break it down in this News guide.
Quick Guide
You can edit videos on Facebook by using the built-in tools when uploading a new Reel (for trimming, adding text, audio, effects) or by editing an existing post’s details (like title, tags, captions) in the Post Options menu; for more complex edits like trimming live videos or advanced features, use Meta Business Suite or third-party editors like Canva or Vizard.
How to Edit Video on Facebook: Editing a New Reel on Mobile
Editing a video directly on Facebook using Reels is one of the fastest ways to create engaging content without third-party apps. The built-in Reel editor on mobile gives you essential tools to trim clips, add text, music, and effects, and prepare your video for publishing – all in just a few taps.
Step 1: Start a new Reel
Open the Facebook app and tap the “+” icon or your profile picture at the top of the feed. Select Reel or Camera, then either record a new video or upload an existing clip from your phone’s gallery.
Step 2: Use the Reel editor tools
Once your video loads, use the editing panel on the right side of the screen. You can add music or audio, insert text with adjustable fonts, colors, and on-screen timing, and apply stickers or visual effects. Facebook also lets you control playback speed, crop the video, or mirror it for better framing.
Step 3: Add details and publish
Tap Next to move to the final screen. Write a short description, add hashtags, tag people, set a location, and choose who can see your Reel. When everything looks right, tap Share to publish your edited video on Facebook.

How to edit video on Facebook: Editing an existing video on your page
If you’ve already published a video on your Facebook Page and need to update details, Facebook allows you to edit key elements without re-uploading the video. While you can’t change the video file itself, you can still refine how it appears to viewers by editing text, captions, tags, and thumbnails.
Step 1: Switch to your Facebook Page
Click your profile photo in the top corner of Facebook, select See all profiles, then choose the Page where the video was posted. This ensures you’re managing content as the Page, not your personal account.
Step 2: Locate the video
Go to the Videos tab or Reels tab on your Page, depending on the video format. Find the video you want to edit and click its thumbnail to open it.
Step 3: Open editing options
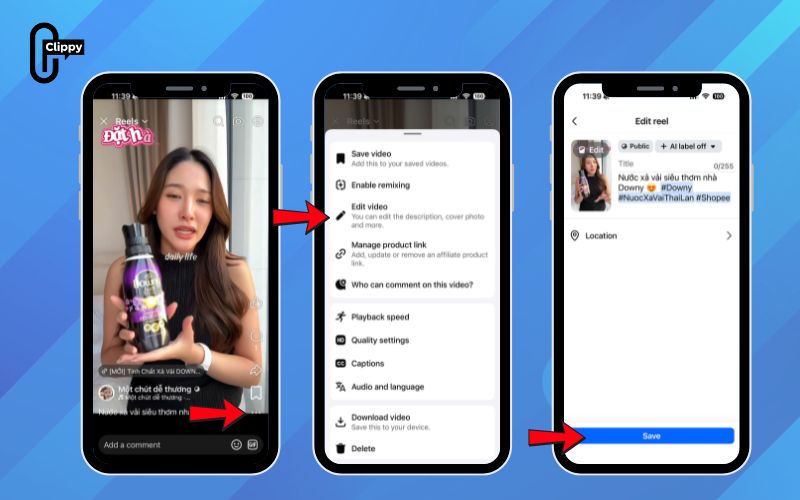
Click Options (usually shown as three dots in the top-right corner). Choose Edit post if you want to update the description, hashtags, or tagged accounts.
Step 4: Edit video settings
Select Video options to adjust the video title, add or edit tags, update captions/subtitles, or change
How to edit video on Facebook: Editing Facebook Live videos in Meta Business Suite
Editing Facebook Live videos after they’ve ended is useful for removing unnecessary sections, highlighting key moments, or improving overall watch time. Facebook allows you to trim Live videos directly through Meta Business Suite, making it easier to repurpose livestreams without re-uploading content.
Step 1: Open Meta Business Suite
Go to Meta Business Suite and make sure you’re logged into the correct Facebook Page. From the main dashboard, click the Content tab to view all published posts and videos.
Step 2: Locate your live video
Use the Post type filter and select Live video to display only previously published livestreams. Scroll through the list or search to find the Live video you want to edit.
Step 3: Access editing options
Click Options (three dots) next to the selected video, then choose Manage post followed by Edit post. This opens the video editing interface.
Step 4: Trim the live video
Select Trim your video and use the slider to set new start and end points. You can cut out pre-stream setup time or post-stream silence for a cleaner replay.
Step 5: Save changes
Preview the trimmed video, then save your changes. Facebook will update the video without affecting engagement metrics or comments already collected.

FAQs about how to edit video on Facebook
Editing videos on Facebook can feel confusing because different tools apply to Reels, Page videos, and Live streams. Below are expert-verified answers to the most common questions users search for when editing videos on Facebook, based on current platform behavior and Meta guidelines.
Can I edit the actual video file after posting on Facebook?
No. Facebook does not allow you to replace or modify the original video file once it’s published. You can only edit metadata such as captions, titles, thumbnails, tags, and trim Live videos. To change the video itself, you must re-upload a new version.
Why can I edit some videos but not others?
Editing options depend on the video type and where it was posted. Reels can be edited only before publishing, Page videos allow metadata edits, and Live videos can be trimmed in Meta Business Suite. Personal profile videos have more limited controls.
Does editing a video affect views, likes, or comments?
Editing descriptions, tags, or thumbnails does not reset engagement. Trimming a Live video also preserves existing reactions and comments. However, deleting and re-uploading a video will reset all metrics.
Can I edit Facebook videos from both mobile and desktop?
Yes, but features differ. Mobile is best for creating and editing Reels, while desktop and Meta Business Suite offer more control over Page videos and Live video trimming.
Is there a time limit to edit Facebook videos?
There’s no strict time limit for editing metadata on Page videos or trimming Live videos. However, Reel edits must be completed before publishing, as post-publish editing is not supported for Reels.

Facebook video editing is simpler when you know the rules. Knowing how to edit video on Facebook helps you optimize Reels, Page videos, and Live streams correctly. Each edit improves how your content is perceived. Master the tools and keep your videos professional.

