


Looking to stay connected with friends, family, or your team in one place? Learning how to create group chat in Facebook Messenger is the fastest way to keep conversations organized and flowing. With just a few taps, you can build a shared space for planning, chatting, and sending updates in real time. Follow this guide from Video Download Free to discover the simplest way to create, customize, and manage your Messenger group chat like a pro.
Quick Guide
- Open Messenger and tap the New Message icon, then add the people you want in your group.
- Send your first message to create the chat, then use the settings menu to rename the group, add members, or customize themes.
- Manage notifications and privacy settings to keep the conversation organized and comfortable for everyone.
What is Facebook messenger group chat?
Facebook Messenger Group Chat is a feature that lets you connect with multiple people in a single conversation. It’s perfect for friends, families, or colleagues who want a shared space to communicate without sending individual messages. This makes group coordination simpler and more seamless.
You can add up to 250 members, share messages, photos, videos, and other media in real time. Messenger also includes reactions, polls, games, custom chat colors, group names, and profile photos. These tools help every member stay updated and aligned effortlessly.
>>> See Also: How to delete Facebook messenger and erase your data fast

How to create group chat in Facebook Messenger from your PC
Creating a Facebook Messenger group chat is quick and only takes a few steps. Once you know where the messaging tools are located, you can set up a group and customize it in minutes.
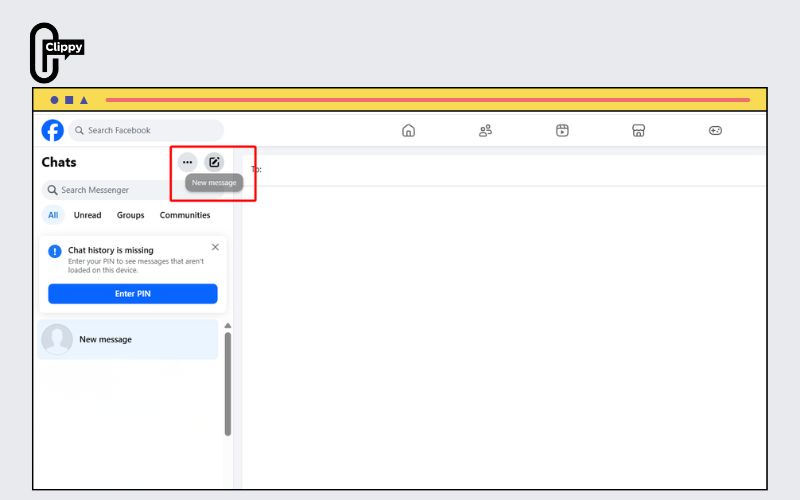
Step 1: Go to your Facebook homepage and click the New Message icon at the bottom-right corner. You can also tap the Messenger icon, where the same New Message button appears.
Step 2: Select the New Message icon again to open a blank chat window. This is the starting point for creating your group conversation.
Step 3: In the “To:” field, type and add the friends or contacts you want to include. You can add up to 250 members at this stage.
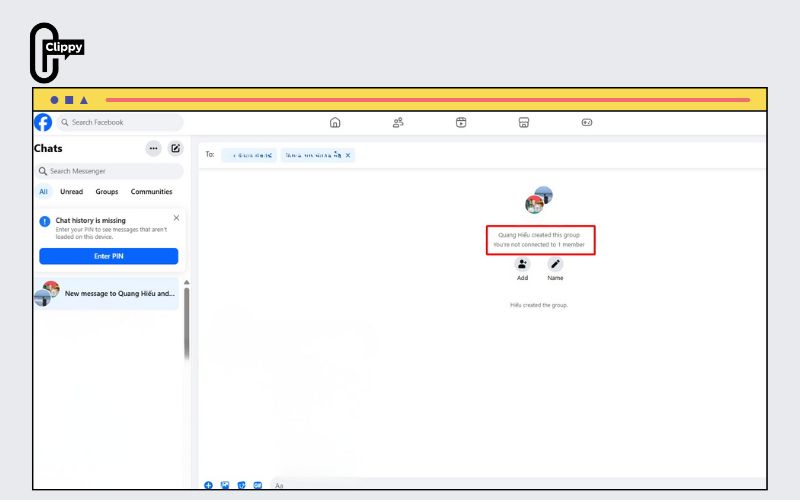
Step 4: Once your members are selected, type your first message and send it. Your group chat is officially created.
>>> See Also: How to unrestrict someone on Facebook Messenger fast 2026
Step 5: To add more people later, tap the Add button inside the chat and choose additional members.
Step 6: To personalize your group, tap the Name option. Enter your preferred group name and save it – your chat header will update automatically.
How to create group chat in Facebook Messenger on Mobile
Creating a Facebook Messenger group chat on mobile is simple and only takes a few taps. Once you open the app, you can quickly add members, send your first message, and customize the entire group.
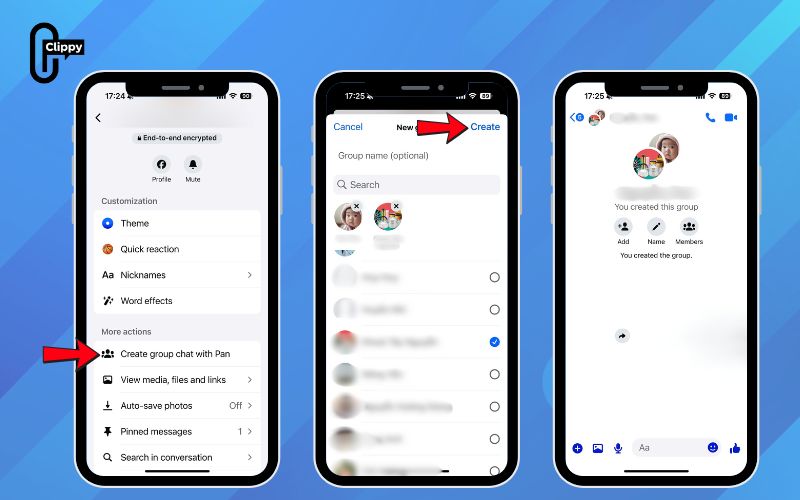
Step 1: Open the Facebook Messenger app on your mobile device. At the top-right corner, tap the New Message icon.
Step 2: In the “To:” field, enter the names of the people you want to include in your group. Send your first message – this automatically creates the new group chat.
Step 3: You can add as many members as you need by repeating the process in the New Message section before sending the first message.
Step 4: After the group is created, tap the group name or member list at the top center of the chat to access customization settings.
Step 5: From the settings menu, you can change the group name, add new members, approve member requests, share an invitation link, set nicknames, choose a theme, view shared content, archive the chat, and more.
>>> See Also: How to find my Facebook messenger username most users skip
How to manage Messenger group chat easily
Managing a Messenger group chat becomes much easier when you understand the core tools and settings available inside the app. With just a few adjustments, you can keep conversations organized, maintain a positive environment, and create a space where everyone communicates comfortably.
- Create the Group Chat: Open Messenger, tap the New Message icon, select Create New Group, add your contacts, and name the group. Once you tap Create, your group chat is ready for messaging.
- Manage Members: As an admin, you can add more people through Add Members in the settings. If necessary, you can remove someone by tapping their name and selecting Remove from Group.
- Set Group Preferences: Customize your group with a photo, name, and privacy controls by tapping the group name at the top. This helps shape the chat’s identity and ensures it reflects your group’s purpose.
- Control Notifications: Use settings like Mute Conversation to reduce interruptions while still keeping track of important messages. Each member can personalize notifications based on their needs.
- Share Files and Organize Activities: Send photos, documents, and links directly in the chat to keep everyone informed. You can also create polls or plan events inside the group to streamline coordination.
- Maintain Privacy and Safety: Regularly review privacy settings and remind members to report harmful or inappropriate behavior. This helps keep the group safe, respectful, and enjoyable for everyone.
>>> See Also: How to play Facebook messenger games without any extra apps

Common mistakes to avoid when creating a Facebook group chat
When setting up a Facebook Messenger group chat, a few simple mistakes can lead to confusion, privacy issues, or unnecessary disruptions for members. Being aware of these pitfalls helps you build a smoother, more organized group experience from the start.
- Adding members without permission: Inviting people into the group without asking can feel intrusive. Always check with members beforehand to maintain trust and avoid awkward situations.
- Using unclear or inappropriate group names: A confusing or overly casual name may cause misunderstandings. Choose a name that reflects the group’s purpose so everyone knows what the chat is for.
- Not reviewing privacy and admin settings: Skipping settings can result in unwanted access or changes by members. Assign admins carefully and adjust permissions to control who can add people or modify the group.
- Sending the first message before selecting all members: If you start chatting too early, you might end up with multiple smaller groups. Add everyone first, then send the initial message to keep the conversation unified.
- Ignoring notification preferences: Large groups can quickly become overwhelming if notifications flood everyone’s device. Encourage members to customize notification settings to avoid frustration.
- Forgetting to organize shared content and files: Without proper curation, important information gets lost in the conversation. Use Messenger’s shared media and files section to keep everything easy to locate.
- Adding too many members at once: Huge groups may dilute the conversation and reduce engagement. Keep the group size manageable unless the purpose requires a large audience.
>>> See Also: How to change Facebook Messenger background with hot topics
FAQs about how to create group chat in Facebook Messenger
Managing a Messenger group chat becomes much easier when you know where to find the right settings. Below are the most common questions users ask, along with clear and updated answers to help you troubleshoot and customize your group chats effectively.
How do I delete my Facebook group chat?
Open the group chat and tap the dropdown menu in the top-left corner to access the full settings list. Scroll down to find Delete Chat, tap it, and the conversation will be permanently removed.
Why is my Facebook Messenger group chat not showing?
If a group chat disappears, it may have been archived. Tap the dropdown icon and select Archived Chats to view and restore it back to your main inbox.
If the chat still doesn’t appear, try uninstalling and reinstalling the Messenger app to refresh your data.
How do I set funny group chat nicknames?
Tap the dropdown menu in the chat and select Nickname not Conversation Name, which changes the group’s title.
Choose any member, type the nickname you want, and save it. Every participant will see the updated nickname for that person.
How do I access Facebook Messenger group chat settings?
Open the dropdown menu at the top-left corner of the chat. Here, you’ll find all customization tools, including notification controls, themes, member management, privacy options, and more.
Creating a group chat in Facebook Messenger is simple once you know where to start, and now you have every step to do it confidently. From adding members to customizing names, themes, and settings, you can build a space that keeps everyone connected and informed. Whether it’s for planning, chatting, or sharing updates, your new group chat is ready to bring conversations together. With this guide on how to create group chat in Facebook Messenger, you’re fully equipped to manage and enjoy smoother communication.

